Wednesday, February 27, 2013

DIY Upcycled/Recycled Plant Hanger

Materials
*Board(I used a salvaged one from my hubby's shop and he routed the edges for me)
*Empty cleaned out cans(I used the larger plain tomato sauce ones)
*Paint
*Polyurethane spray
*Screws
*screw driver/drill
*Picture hanger for back of board
*Tung oil or any wood oil
*Plants in pots small enough to fit in your cans
*small plastic plant trays or the plastic bottoms from soda bottles

I started by saving the cans, washing them throughly then painting them. I used acrylic craft paint and sprayed it with the polyurethane to keep it from scraping off. 

Once you know how many cans you want and decided on the type of plants and how much room you need for them. Then you will know the size of the board you need. Mine in this project is 38 inches long. I pre-drilled the board and cans for the holes to hold the cans to the front and then the two on the back for the picture hanger. Take care to make sure you drill the wholes in the cans near the top or you might not be able to screw them in place. My hubby routed the edges but any board will do. I oiled mine with tung oil, but you can use any wood oil our paint it if you prefer.

Now you have the cans and the board ready, let's assemble it. Screw the hanger on the back first or the cans will make it so you can not lay the board flat to do it after. I used a zig zag tooth like hanger but the hardware store has other kind use what ever one suits you. Them screw the cans on and your almost ready to hang it.

Place your plastic liner in the can. I used clear plastic ones that I bought at Walmart in the plant section for about .18 cents each. But the bottoms of soda bottle work well too. Add your plants, hang it and enjoy!

Wednesday, February 20, 2013

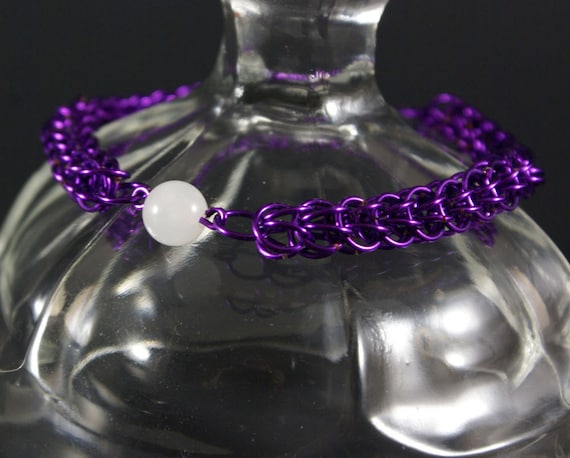
February Giveaway- Matching Chainmaille Bracelet and Earring Set

I am a little later then I like to do my monthly giveaway but here it is as promised A Chainmaille giveaway! 
The set is hand made one ring at a time with purple colored copper rings and round white quartz beads. This chainmaille is Full Persian also known as Foxtail. The bracelet is just over 7 1/2 inches long. The earrings hang about 1 1/2 inches from the base of the silver plated earwire.


How to enter.  You can get up to 4 entries. Each entry had to be in a separate comment below. To enter you must do at least one of the following 4 things. If you do #2, #3 or #4 you will need to leave a comment for each separately here on this blog post for them to count. If you are already a follower of my blog and/or Facebook just leave a comment stating that.
1. Comment below on this blog post with what your favorite type of jewelry
2. Follow my blog with Google Connect which is on the left side bar menu.
3. Follow my Facebook page
4. Sign up for my monthly newsletter using the sign up box on the left side bar menu.

This giveaway will end on Wednesday February 27th at midnight and the winner will be announced on Thursday February 28th. You must be 18 to enter.  

Keep an eye out for next months giveaway of a bar of my handmade Olive Oil & Shea Butter soap with rosemary and lavender essential oils.


Monday, February 18, 2013

Koala Pen

I just finished this cite koala pen. It is a bit larger them I planned but I am happy with it. If it was any larger the pen would be hard to use.  The next pens I make I will be sure to keep the focal sculpture smaller.

Monday, February 4, 2013

My First Batch Of Liquid Soap

I have researched, I have invested in the materials(thankfully most of the ingredients are the same as the cold process soap I make) and today I made my first batch of liquid soap. In many ways it is very similar to making cold process soap. The biggest difference seems to be is the use of alcohols, PH buffers and diluting the soap paste. I decided to start off with a mild blend of olive oil & coconut oil. I have 3 jars of this first test batch. One with my own essential oil blend for hair(shampoo), one with lemongrass essential oil & lime essential oil(dish soap) and the last with lavender essential oil(body & hands). I am excited to see how they turn out. Unlike cold process soap where they need to cure for 4-6 weeks the liquid soap only needs to sit for 1-2 weeks. I will update when it is ready.
Pic 1 the mixing pot
Pic 2 staying to turn into the soap paste
Pic 3 in the jars

Friday, February 1, 2013

Today one a day

Boxes, boxes, boxes.... Yes more boxes. I love making them and they make wonderful Valentines gifts. Today I  made 16 boxes and I am picking up more to decorate this weekend.

Pin It

Related Posts Plugin for WordPress, Blogger...